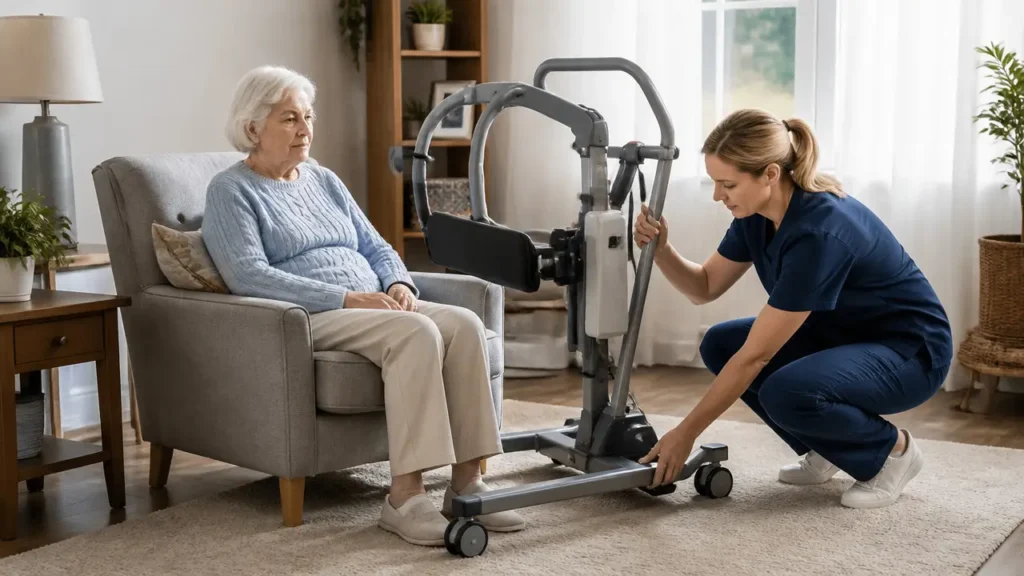
A powered sit-to-stand lift can make transfers much safer when the person can still do part of the work but should not be manually lifted by a caregiver. It supports the rise and controlled move between surfaces while reducing the strain that causes caregiver injuries and last-second falls.
But this device only works when it matches the person. A powered sit-to-stand lift is not a shortcut for someone who cannot bear weight at all, cannot follow instructions, or cannot stay upright during the move. In those cases, the safer answer is usually a full-body lift. For the bigger transfer picture, start with the mobility and transfers master guide and compare it with passive Hoyer-type lifts.
When to Use This
A powered sit-to-stand lift usually fits when the person:
- can bear some weight through at least one or both legs
- can follow simple directions
- can hold the handles or otherwise participate safely
- has enough upper-body control to stay aligned during the lift
- needs more support than a manual pivot transfer can safely provide
These lifts are often used for:
- bed to chair transfers
- chair to commode transfers
- toileting support
- short standing tasks like dressing
They are often a good middle ground between bed-to-chair transfers by hand and a full-body lift.
Before You Start
Match the lift to the person
Before each use, confirm:
- the weight is within the lift limit
- the sling is the right style and size
- the person can tolerate the standing position
- the person is wearing secure footwear
- the destination surface is ready
The FDA's patient-lift safety guidance matters here: correct sling choice, condition checks, and training are not optional details.
Check the equipment
Before moving anyone, check:
- battery charge or power status
- emergency stop and emergency lowering
- sling seams, loops, clips, and fabric
- footplate stability
- shin pad alignment
- wheel movement and base width adjustment
Do not use the lift if any part looks worn, bent, torn, or unreliable.
Set up the room
Good setup usually means:
- clear floor around both surfaces
- destination chair or commode in place
- wheelchair or commode brakes locked
- any footrests or armrests moved if needed
- enough room to widen the lift base and approach straight on
If the room is cramped, review public restroom and tight space transfers before assuming the lift will fit cleanly.
Step-by-Step Technique
Every model is a little different, so follow the manufacturer's instructions first. In general, the sequence looks like this:
- Bring the person to a seated edge position with feet on the floor or ready for the footplate.
- Place the correct sit-to-stand sling behind the back at the recommended height.
- Fasten any waist or support strap the sling requires.
- Open the lift base enough for stable approach.
- Position the footplate and bring the shins gently to the knee pad.
- Attach the sling loops evenly on both sides.
- Ask the person to place hands on the handles and stay upright.
- Use the powered control to raise slowly while watching knee position, sling fit, and body alignment.
- Move only when the person is stable and clear of the original seat.
- Lower in front of the destination until the backs of the legs touch and the person is controlled into sitting.
The move should be slow enough to catch problems early. If the person is twisting, sliding down the sling, or losing knee contact, stop and correct the setup before continuing.
Safety Checks and Common Errors
Common errors include:
- using the lift for someone who cannot bear weight
- using the wrong sling type or size
- attaching loops unevenly
- skipping shin pad and foot placement checks
- moving before the person is fully stable
- trying to force the lift into a room with poor clearance
Other important safety points:
- do not improvise with a sling not designed for that lift
- do not pull on the person's arms to "help"
- do not treat the lift as a substitute for good technique and safe patient handling at home
- do not leave pressure points from the sling, knee pad, or footplate unchecked
If skin integrity is already a concern, add positioning basics to reduce pressure and shear and pressure relief schedule ideas.
When to Stop or Get Help
Stop the transfer and reassess if:
- the person suddenly cannot bear weight
- knees buckle off the support
- the person slumps or cannot keep the upper body aligned
- the sling rides up painfully or slips
- the room is too tight to finish the move safely
- the person becomes dizzy, fearful, or confused enough to stop participating
Get clinical help when:
- the current lift type may no longer match the person's ability
- repeated transfers are still unsafe despite training
- skin is being pinched or rubbed by the sling or pads
- the person may now need a full-body lift instead
This is also the point to compare sit-to-stand lift setup and transfer basics and best sit-to-stand lifts for home use if equipment choice itself is part of the problem.
Frequently Asked Questions
Who is a powered sit-to-stand lift for?
It is for someone who can bear some weight, follow directions, and stay upright enough to participate in the transfer.
When is a powered sit-to-stand lift not appropriate?
It is usually not appropriate when the person is fully non-weight-bearing, cannot cooperate, or cannot maintain enough upper-body control for the move.
Do both feet have to stay on the footplate?
Yes, unless the specific transfer plan and device instructions say otherwise. Stable foot placement is a basic safety requirement.
Why is shin-pad placement so important?
Because it helps control the lower legs and reduces slipping forward or losing alignment during the rise.
Can this lift be used for toileting?
Often yes, if the person's ability matches the lift and the bathroom space allows safe setup.
What is the most common setup mistake?
Using the wrong sling or placing it at the wrong height, which can make the person slip, lean, or feel unsafe during the lift.
When should I switch to a full-body lift?
When the person can no longer bear enough weight, cannot stay aligned, or needs more support than a sit-to-stand device can safely provide.
If you are still deciding between device levels, continue with sit-to-stand lift setup and transfer, passive Hoyer-type lifts, and best patient lifts and slings. If the issue is room fit, compare public restroom and tight space transfers and bed height and bed rail safety.