Two-person assist is not just "one-person assist, but harder." It is a different job. Once two helpers are involved, the transfer only works if each person has a clear role, both are using the same timing, and neither is trying to dead-lift the person through the move.
That is why more hands do not automatically make a transfer safer. Two uncoordinated helpers can create a push-pull problem, twist the person's body, or leave both caregivers straining at once. The safer goal is matched roles, matched timing, and a realistic decision about whether this should still be a manual transfer at all. For the bigger framework first, start with the mobility and transfers master guide and assessing transfer readiness.
When to Use This
Two-person assist makes sense when one trained helper cannot safely control the transfer alone.
Common situations include:
- the person can bear some weight but is too weak or too unsteady for one helper
- the person can stand but cannot reliably take small turning steps
- the person is unpredictable, impulsive, or not following cues well
- the person is heavier than one helper can manage without strain
- tight joints, stiffness, or attached equipment make the move harder to control
- one helper can get the person up, but not safely turn and lower them
Some people also need two helpers because their ability changes through the day. A person may do well with one helper in the morning and need two later when they are tired, painful, dizzy, or confused. That is where safe patient handling policies at home and a written care plan become useful.
Just as important, two-person assist is not the answer to every difficult transfer. Sometimes the right answer is:
- one helper with a better setup
- a gait belt and clearer cueing
- a sliding method instead of a stand-pivot
- a sit-to-stand lift
- a full mechanical lift
If the person cannot bear weight, cannot clear the seat, or cannot help with the move at all, this may already be beyond manual two-person assist. In that case, compare pivot vs. sliding transfer, powered sit-to-stand lifts, and passive Hoyer-type lifts.
Before You Start
Set the destination before anyone stands
Do not improvise mid-transfer.
Before the move:
- place the chair, bed, or commode close enough for a short transfer
- lock any wheels that should not move
- move footrests, armrests, or clutter out of the way when appropriate
- make sure the person's feet can get flat to the floor
- use a firm seat with arms when possible instead of a soft low sofa
The shorter and cleaner the route, the easier it is for two helpers to stay organized.
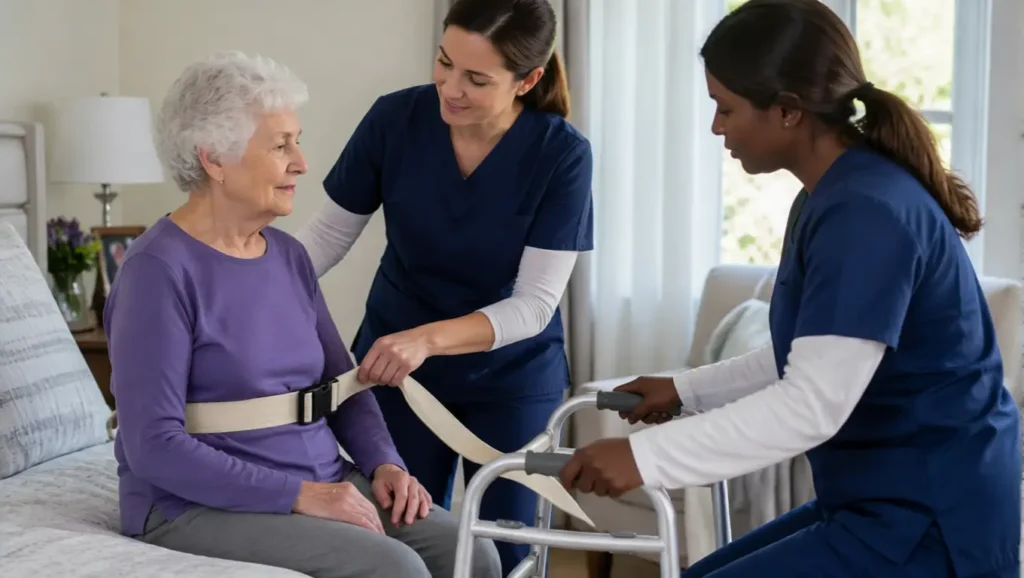
Decide who is leading and who is controlling the turn
One helper must lead the transfer. The other helper supports the agreed task. If both talk, both count, or both change the plan mid-move, the transfer gets messy fast.
A practical split is:
- lead helper: cues the person, counts, helps with forward weight shift and the rise to standing
- second helper: stabilizes from the side or behind, helps guide the hips and controls the turn and lowering
That role split matters because a good two-person transfer is not two people lifting at once. It is one person helping the body come forward and up, while the other helps control where that body goes next.
Use equipment that helps, not bare-arm lifting
When appropriate, use a gait belt or another transfer aid the team already knows how to use. Belt-based pulling and guidance are usually easier on helpers than grabbing under the arms and hauling upward.
Do not:
- let the person hang from your neck
- pull them under the arms
- drag on the shoulders
- assume two strong people can replace good technique
If gait belt use is part of the plan, review gait belt placement and comfort.
Make sure the person is ready to participate
Before the count, check:
- the person understands what is about to happen
- feet are flat and placed well
- hands know where to push from or reach to
- shoes are grippy enough
- dizziness, agitation, or pain is not suddenly worse
If the person is very agitated, not attentive, or fighting the move, forcing a manual transfer usually makes it less safe, not more safe.
Agree on the words before the move
Good two-person transfers sound simple because the talking is simple.
Pick short phrases such as:
- "Scoot forward."
- "Feet flat."
- "Lean forward."
- "Ready?"
- "Stand on three."
- "Pause."
- "Turn."
- "Back up."
- "Sit."
The count is not decoration. It is what gets both helpers moving together instead of one pulling early and the other arriving late.
Step-by-Step Technique
The exact hand placement varies by transfer, equipment, and diagnosis, but the sequence stays similar.
1. Bring the person to the front of the seat
If they are halfway back in the chair, the stand will already be harder.
Have the person:
- scoot forward
- place both feet on the floor
- lean slightly forward
- keep hands on the armrests or the agreed support surface
The helpers should already be in position before the stand begins.
2. Start with body positions that protect the helpers
Both helpers need:
- a wide base
- one foot slightly ahead of the other
- knees bent
- backs staying neutral
- room to move their feet instead of twisting
This is where safe patient handling at home still matters, but body mechanics alone are not enough if the task really needs a lift or more equipment.
3. The lead helper brings the weight forward, not straight up
The stand should come from a forward weight shift, not from the helpers trying to hoist the person vertically.
On the agreed count:
- the person leans forward
- the lead helper helps guide that forward shift
- both helpers rise with their legs
- the second helper stabilizes and gets ready to guide the pivot
A small rocking motion can help some people create momentum, but only if it stays controlled.
4. Pause once the hips clear the seat
Do not rush from "barely standing" straight into the turn.
Take a beat to confirm:
- knees are not buckling
- the person is truly upright enough to continue
- both helpers still have good footing
- the destination is still clear
If the stand is already failing here, lower back to the seat. That is safer than forcing the turn.
5. Turn with small steps and clear roles
During the turn:
- the lead helper keeps cueing and controls the pace
- the second helper helps guide the hips toward the destination
- both helpers move their feet
- the person takes short steps if able
Do not twist at the waist. Do not let one helper drag from the front while the other tries to swing the hips around from behind. The movement should feel like a controlled step-turn, not a tug-of-war.
6. Back up only the last few inches
Once lined up with the destination:
- take short backward steps only as needed
- stop when the legs touch the surface
- have the person reach back if appropriate
- lower slowly together
The descent matters as much as the stand. Many "successful" two-person transfers go wrong at the last second because one helper lets go early or the person drops before the seat is really there.
7. Reposition and reset after the transfer
Once seated:
- adjust footrests, arms, or supports back into place
- check that the person is centered and comfortable
- make sure no skin, tubing, or clothing is trapped
- ask whether dizziness, pain, or shortness of breath changed during the move
That quick reset catches the problems people often notice too late.
Safety Checks and Common Errors
Common mistakes
- both helpers trying to do the same job
- no lead person and no agreed count
- trying to manually lift instead of guiding a stand and pivot
- pulling under the arms or letting the person cling to the neck
- starting before the feet are flat and the route is clear
- using a low soft chair that makes standing much harder
- twisting through the turn instead of moving the feet
- talking too much and changing the plan mid-transfer
Another frequent mistake is assuming two people can safely do a task just because they are both present. If the person cannot bear enough weight or cannot follow the sequence, manual help may still be the wrong method.
Warning signs the transfer is too manual for the situation
Stop and rethink the method if:
- the person cannot get the hips off the surface
- knees buckle right away
- one helper is doing almost all the work
- the person cannot take any turning steps
- the helpers are straining or losing their own balance
- the move only works when someone lifts under the arms
Those are signs the job may need a device, not better teamwork.
Special caution with lifts and variable ability
Some two-person tasks are not manual stand-pivots. They are two-person lift setups. If you are using a sit-to-stand lift or full-body lift, the second helper may be needed for:
- sling placement
- loop checks
- leg positioning
- line and tubing management
- steadying the person during the move
If ability varies from hour to hour, a plan A, B, and C approach often works better than one rigid rule. That might mean one-helper assist when the person is strong, two-helper assist when they are slower, and lift use when they are too weak to participate.
When to Stop or Get Help
Stop and escalate when:
- the second helper is not available
- the person is more confused, physically resisting help, or in more pain than usual
- dizziness or faintness starts during setup
- the person cannot bear weight on the legs
- there is a new fracture concern, severe osteoporosis issue, or new one-sided weakness
- the transfer keeps starting to fail even with two helpers
If a transfer is charted or known as two-person assist, do not decide to "just do it alone this once." Waiting for help is safer than gambling on a rushed solo attempt.
This is also the point to move toward a different tool or plan, such as:
- sit-to-stand lift setup and transfer basics
- powered sit-to-stand lifts
- passive Hoyer-type lifts
- using a sliding sheet or transfer mat
- what to do if a transfer starts to fail
Frequently Asked Questions
When does one-person assist become two-person assist?
It becomes a two-person job when one helper can no longer control the stand, turn, and lowering safely without strain or loss of balance.
Does two-person assist mean both helpers should lift?
No. The safer pattern is usually one helper leading the weight shift and one helper guiding and controlling the turn, not two people dead-lifting at once.
Who should count during the transfer?
One lead helper should count and direct the timing so both helpers move together.
Is it okay for the person to hold onto my neck?
No. That can pull the helper off balance. It is safer for the person to use armrests, a support surface, or the agreed hold.
What if one helper is much stronger than the other?
Strength is less important than clear roles and good timing. One very strong person does not replace a coordinated second helper.
What if the second helper is not available yet?
Wait, get help, or change to a safer device-based plan. Do not try a two-person transfer alone.
How do I know this should really be a lift instead?
If the person cannot bear weight, cannot clear the seat, cannot take steps, or keeps collapsing despite two helpers, manual assist is probably no longer the right method.
Can family caregivers do two-person assists without training?
They should get hands-on instruction first whenever possible. Two-person assist is about practiced coordination, not guesswork.
If you need the decision rules behind the staffing choice, continue with assessing transfer readiness and safe patient handling policies at home. If manual help is no longer enough, compare sit-to-stand lift setup, powered sit-to-stand lifts, and passive Hoyer-type lifts.