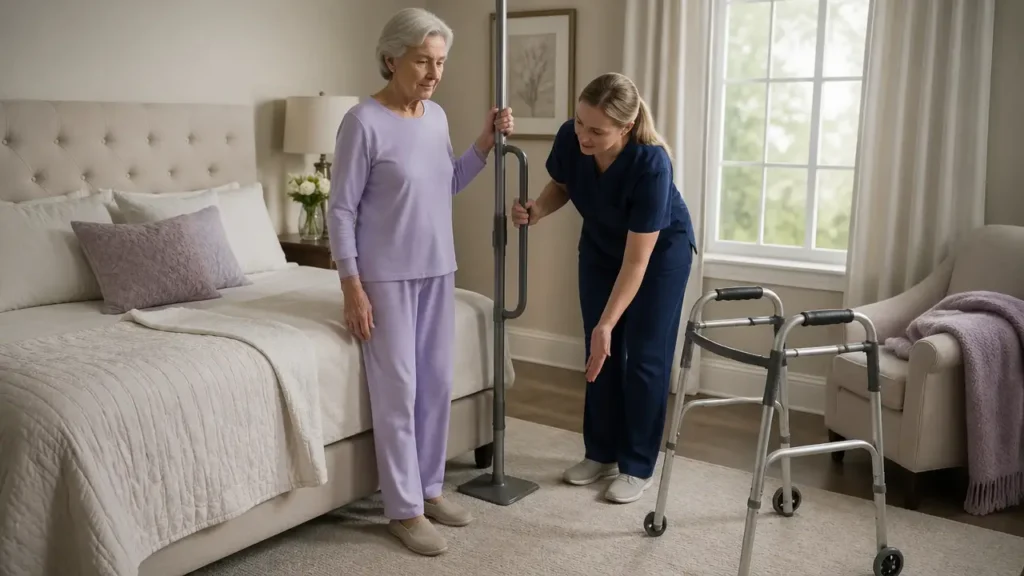
A SuperPole-style transfer pole can solve one very specific problem well: the person can still do part of the move, but they need a solid handhold in the right place to sit, stand, or pivot with less fear. That is why these poles can work so well beside a bed, next to a toilet, near a favorite chair, or at the edge of a tub transfer setup. They improve leverage. They do not replace leg strength, upper-body control, or a full lift plan.
Placement is what makes or breaks the pole. A transfer pole that is even one step too far away becomes something the person reaches for after they are already off balance. A pole that is installed in the wrong room, on the wrong surface, or beside the bed with a risky gap can create a new hazard instead of fixing the old one. If you want the bigger picture first, start with the mobility and transfers master guide and bed-to-chair transfer basics.
When to Use This
Use a transfer pole when the person:
- can still bear some weight through the legs or arms
- understands the move and can follow cues
- repeats the same difficult transfer in the same spot every day
- needs a stable grab point more than a full-body lift
- does better with a fixed support point than with grabbing furniture
Common good fits include:
- getting up from bed
- rising from a toilet
- standing from a firm chair
- steadying before a pivot to a wheelchair or walker
- managing the outside edge of a tub transfer setup
These poles are usually a poor fit when the person:
- cannot safely help with the stand at all
- hangs with most of their body weight on the pole
- buckles suddenly or drops without warning
- has severe confusion, restlessness, or high entrapment risk beside the bed
- really needs a standing aid or lift, not just a handhold
If you are still deciding between a fixed pole and a stronger device, compare transfer poles and floor-to-ceiling posts, portable standing aids, and sit-to-stand lifts for home use.
Before You Start
Match the pole to the actual transfer
Do not choose the pole by where it looks nice. Choose it by the motion that keeps going wrong.
Ask:
- Is the hard part getting from lying to sitting, or sitting to standing?
- Does the person pull mostly upward, or do they need a support point while turning?
- Is one side clearly stronger?
- Is the transfer happening at bed, toilet, chair, or tub edge?
- Does the person need one stable pole, or a pivoting support arm too?
Manufacturers often suggest thinking through the whole transfer path before installation, not just the starting point. That matters. The pole should support the part of the move where confidence drops, not the part that is already easy.
Check the room before you buy or install
Many SuperPole-style systems depend on a sound floor and ceiling with a true vertical fit. That means you should stop and check for:
- flat ceiling rather than sloped or angled ceiling
- known ceiling structure rather than guessing what is above the drywall
- stable floor rather than loose floor covering
- no direct water exposure
- enough clearance for bedding, chair arms, walkers, or wheelchair footrests
- enough room for the person to stand without twisting around the pole
That last point matters more than people expect. A pole can be perfectly strong and still be badly placed if the person has to reach behind the body or step around it awkwardly.
Understand what the pole is not for
A transfer pole is meant for moderate vertical support during sitting, standing, and short pivoting tasks. It is not meant to:
- act like a restraint
- block someone from leaving bed
- catch a full fall
- replace a properly installed wet-area grab bar inside the shower
- carry the person's full body weight like a lift
If the main problem is a bathroom wall with no good bar location, compare grab bar placement for toilet and tub transfers before assuming a pole is the only answer.
Bedside use needs an extra safety check
Bedside placement is where a transfer pole can help a lot, but it is also where entrapment risk matters most. A pole beside a mattress can create a dangerous gap if it is set at an in-between distance. Soft mattresses, adjustable beds, mattress compression, and bedding changes can all change that gap over time.
That is why bedside poles need more than a quick eyeball test. They need a careful fit, regular re-checks, and honest assessment of the person using them. If bed-edge support is part of the problem, it also helps to compare bed rail safety and entrapment risks and repositioning in bed without lifting.
Step-by-Step Technique
1. Watch the transfer before choosing the final spot
Set up the chair, bed, toilet, or wheelchair the way it is normally used. Then watch where the person reaches, where the knees drift, where balance breaks, and which side leads the move.
You are looking for the exact moment when a stable handhold would help most:
- just before standing
- during the forward weight shift
- while pivoting
- while lowering onto the seat
If the person has one stronger side, place the setup so that stronger side can do more of the work when possible.
2. Mark the placement by task, not by guesswork
A good starting point is practical and specific.
For bedside use:
- place the pole beside the hip or belt line
- keep it as close to the bed as possible while still clearing bedding
- make sure the person can stand comfortably without the pole being too close
For a toilet or chair transfer:
- place the pole about 3 to 10 inches in front of the knees when seated
- place it about 2 to 6 inches to the side of the knees
- confirm there is enough room to stand and turn without the pole blocking the move
For a tub-edge setup:
- place the base near the outer edge of the tub
- many instructions suggest about halfway along the tub length
- make sure the pole supports the transfer path into or out of the tub, not just the first grab
That knee-based placement rule is one of the most useful details in the whole category. It keeps the pole close enough to assist the rise without forcing the person to hug it or reach too far.
3. Install to the structure, not just to the room
Once the location is marked, install only if the structure is appropriate for that model. Tension-mounted versions need a true vertical line from floor to ceiling and square contact at the top plate. Some situations also call for extra anchoring into ceiling joists, especially with heavier use or when regular re-tightening may be missed.
Important installation limits include:
- do not install on angled ceilings
- do not install where the ceiling structure is unknown
- do not install on loose floor coverings
- do not install where the pole will be directly exposed to water
- do not overtighten the extension screw
If the home needs a floor-receptacle model instead of a standard tension pole, that is a more specialized install. Those systems are meant for structurally sound concrete slab floors and are better treated as qualified-contractor jobs, not casual DIY.
4. Get the pole truly vertical and fully tested
After the pole is raised into place, the top plate needs to contact the ceiling squarely and the pole needs to be truly vertical. Many instructions suggest using a level or comparing to a known vertical line in the room.
Then do not stop at "looks good." Test it hard.
The manufacturer guidance for this category is to hold the pole at about mid-height and push it side to side with firm body-weight force. If the base or top plate shifts, tighten and test again. A gentle wiggle is not enough. The first real test should happen before the person ever trusts the pole.
After that:
- lock the tensioning hardware as directed for the model
- recheck the pole in the first days after install
- check again after seasonal changes if the home environment shifts
- keep a regular inspection routine, often monthly
This is one reason a transfer pole is not a "set it once and forget it" device.
5. Teach the person how to use it for the real move
Once the pole is installed, teach the move the same way every time.
For a sit-to-stand:
- bring the person to the front of the seat
- place feet flat and slightly back under the knees
- have them grip the pole or pivot bar where the shoulder stays comfortable
- cue a forward lean first, then a push and pull to stand
- keep the nose moving forward over the feet rather than leaning backward
For a pivot transfer:
- stand only after balance is steady
- take small steps, not one rushed spin
- turn the whole body rather than twisting at the trunk
- back up until the legs feel the destination seat
- lower with control using the pole, seat arm, or grab bar as appropriate
If a pivot bar is part of the system, set the lock positions to match the real transfer. Some setups use different locked positions for in-bed support, rising to sit, standing from a chair, toilet support, or tub entry. The right bar angle can make the motion feel much more natural.
6. Keep the caregiver role clear
The pole should reduce pulling, not encourage the caregiver to do more awkward lifting.
During assisted use:
- stay close enough to guard, not so close that you block the pole
- use a gait belt if added support is needed
- never let the person pull on your neck or shoulders
- do not yank under the arms
- block the weaker knee only if that is part of a practiced safe technique
If the transfer still depends on you doing most of the lift, the pole is probably not enough. Review what to do if a transfer starts to fail, gait belt placement and comfort, and powered sit-to-stand lift use before the situation gets more risky.
Safety Checks and Common Errors
Common errors
Common mistakes with transfer poles include:
- placing the pole where the person reaches for it after they are already tipping
- using a pole for someone who really needs a lift or two-person assist
- installing on the wrong ceiling or floor surface
- never rechecking tension after install
- treating a bathroom transfer pole like an inside-shower grab bar
- setting a pivot bar at a poor height or angle
- leaving too little thought to bedside entrapment risk
The biggest mistake is asking the pole to do lifting work. A transfer pole is best when it improves leverage and balance for someone who can still help. It is a bad match for a person who suddenly drops, freezes hard in mid-move, or hangs on the device for most of their weight.
Bedside red flags
Beside the bed, watch for:
- a middle-size gap between the pole and mattress
- mattress compression that changes the gap
- adjustable bed movement that changes the gap
- pivot arms or bars stored too close to the mattress
- people with confusion, agitation, poor judgment, or uncontrolled movement
The danger is the classic "in-between" gap. The safer pattern is usually either very close or clearly far away, depending on the exact setup and instructions. If you cannot keep the pole position stable beside the bed, do not keep improvising around it.
Ongoing checks that matter
Recheck the pole when:
- bedding changes alter bed position
- the bed height changes
- the person starts using more force on the device
- the home goes through humidity or seasonal movement
- the transfer path changes because a walker, wheelchair, or commode moved
- hardware loosens, shifts, or squeaks
This is also a good time to inspect the rest of the route. A perfect pole does not fix wet floors, bad footwear, dim light, or a wheelchair parked at the wrong angle.
When to Stop or Get Help
Stop and get professional help when:
- the person cannot bear enough weight to rise with a handhold
- the knees buckle even with careful guarding
- the person has major dizziness, freezing, or collapse episodes
- there is shoulder pain, arm pain, or trunk pain during pole use
- bedside placement creates unresolved entrapment concerns
- you are unsure what the ceiling or floor structure can safely handle
- the bathroom or bedroom is too tight to let the person use the pole without twisting
- caregivers are still doing a hard lift despite the pole
Bring in OT, PT, or a qualified installer when the setup is complicated or the person's mobility has changed. If the question is no longer "where should the pole go?" but "is a pole enough at all?" move up the chain instead of forcing a middle-stage device to do a late-stage job.
Frequently Asked Questions
What is a SuperPole-style transfer pole used for?
It is used to give a stable vertical support point for sitting, standing, and short pivot transfers near a bed, toilet, chair, wheelchair, or tub edge.
Where should a transfer pole go beside a bed?
Usually beside the person's hip or belt line and as close to the bed as possible while still clearing bedding and avoiding a risky gap.
How close should a transfer pole be to a toilet or chair?
A common starting point is about 3 to 10 inches in front of the knees and 2 to 6 inches to the side of the knees when the person is seated.
Can a transfer pole replace a grab bar in the bathroom?
Sometimes near a toilet or tub entry point, but not as a blanket replacement. Many transfer poles are not meant for direct water exposure or true inside-shower use.
How often should a tension-mounted transfer pole be checked?
Check it after installation, during the first days of use, after seasonal changes if needed, and then on a regular schedule such as monthly.
Is a transfer pole enough if the person cannot stand without being lifted?
Usually no. If the person needs most of their weight lifted, it is time to look at a standing aid, sit-to-stand lift, or full mechanical lift.
Are transfer poles safe for people with dementia or confusion?
They can be risky beside the bed if the person has poor judgment, agitation, or high entrapment risk. That kind of setup needs much more careful assessment.
Can I install a SuperPole-style pole anywhere there is floor and ceiling?
No. The surface and structure still have to match the device. Flat ceilings, known structure, dry placement, and proper installation all matter.
If you are deciding whether a fixed pole is the right device, compare the best transfer poles and floor-to-ceiling posts with portable standing aids and sit-to-stand lifts for home use. If the main question is bedside safety, continue with bed rail entrapment risks and alternatives and repositioning in bed without lifting. For bathroom routes, grab bar placement for toilet and tub transfers is the most useful next step.